Hello and welcome to Ambar Kelly‘s CPD on riser shafts and the importance of eliminating risk through design.
Learning Aims
We will begin this presentation by giving an overview of riser shafts and the challenges they pose.
We will then look at the worst shaft fire in living memory, to ask whether the construction industry is heeding the lessons learnt from this disastrous event. We will explore the areas the industry must focus on, to highlight the design considerations which must be adopted to ensure risk is eliminated at a project’s earliest stages.
We will then move on to give in-depth insight into current testing and regulations, and the materials used in riser construction and the misconceptions surrounding them.
Our concluding thought will be one of simplicity; stressing the importance of eliminating risk through informed, efficient design undertaken from a building’s very inception.
Login to record your CPD points

Ambar Kelly has been specialising in riser shafts for 10 years.
We manufacture a bespoke riser zone solution which touches every part of a multi-storey building.
During our journey we have witnessed many challenges with the riser shaft. The industry still looks at riser openings, or a hole, as a risk. For that reason, a riser zone solution is not designed.
The downside of this perception is the focus on falling from height risk, which gives a false direction towards a management issue and not a design requirement.
Building Shafts
What does the word shaft conjure up in your head? Think of three examples of building shafts?
What was the worst shaft fire in living memory? It was the King’s Cross London Underground Station fire on the 18th of November 1987. It took place at approximately 7:30 in the evening and 31 people were killed and there were very many injured.
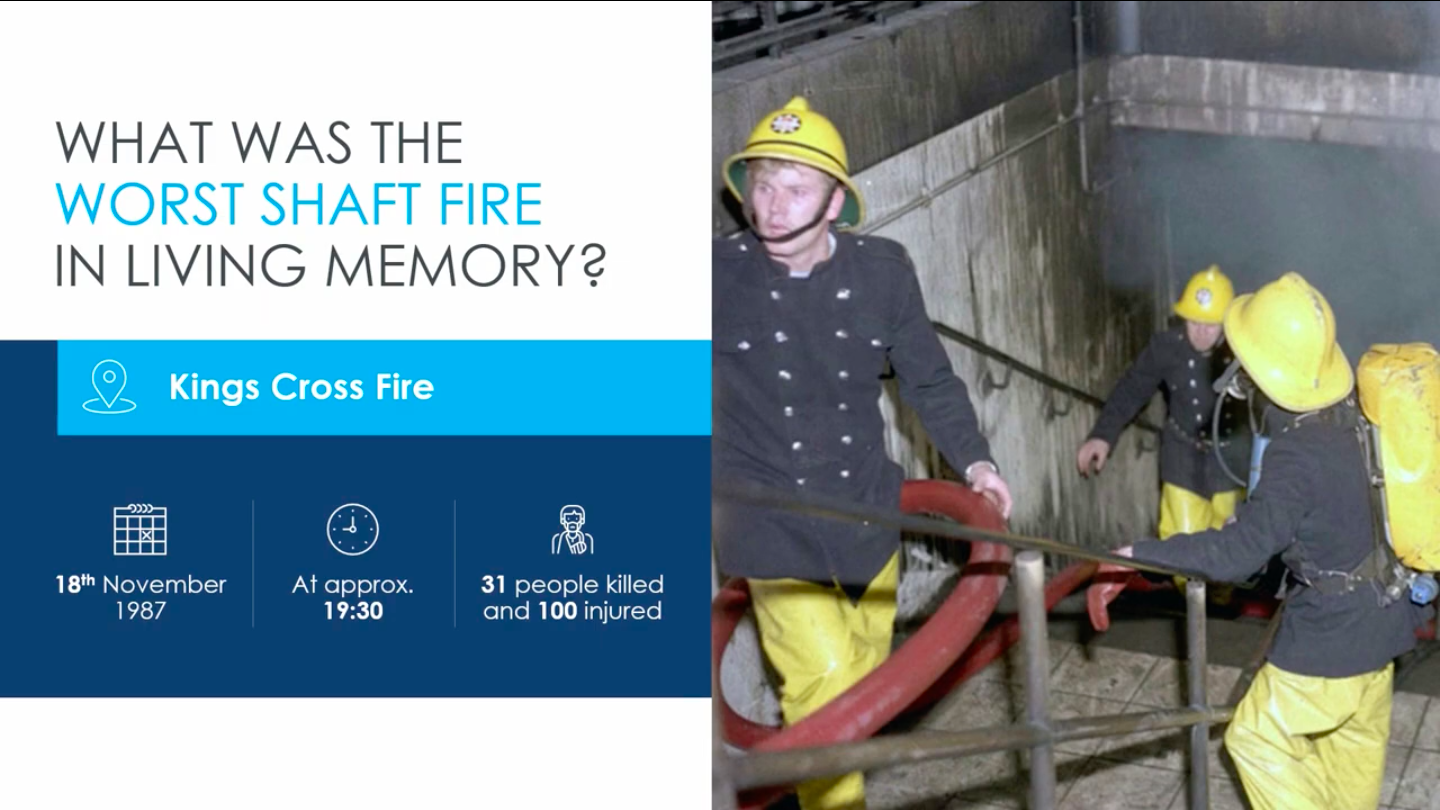
But was it an accident waiting to happen? When the public inquiry carried out an investigation into the fire, the cause of the fire was a discarded lit match which fell on the timber escalator and rose up the escalator steps. When fire investigators started to examine the underside of the escalator, they discovered that there were 17 miniature fire marks from a similar activity. But the 18th one actually caught fire.
What made the fire worse? Was it the shaft, complacency or ignorance? During the public inquiry, computer modelling at the time identified the ‘trough effect’ where the flame laid down and super-heated the first 20 metres above the fire of the wooden escalator stairs. This finding suggested that the fuel for the fire was the wooden escalator stairs which were in-use for 76 years. It was essentially a dormant fuel cell, an accident waiting to happen.
For this reason, people that were investigating the cause of the fire questioned the results of the model. They carried out a practical test, where they recreated the shaft to see if the exact same results would occur again in this real-life mock-up. And to their horror they found it did, which validated the computer model.
The King‘s Cross fire changed how shafts, tunnels of all types are designed, specified and built. With the last wooden escalator in the underground removed in 2013, what were the lessons learnt from the investigation into the King‘s Cross underground fire?
The Grenfell tragedy
For the construction industry, the Grenfell tragedy has had many implications on building design and safety. Lessons learnt from both the King’s Cross and Grenfell fires include:
- To eliminate risk through design
- To use the correct materials
- Take into account all the elements connected to the location
- Demand the appropriate testing for the intended use
Isn’t it time the whole construction industry learnt from these lessons?
In terms of riser shafts in tall buildings, what happens now?
Lessons Learned
On a project, you’ll find the following issues:
- No design
- Money is king
- Complacency
- No single responsibility
- No joined-up thinking
- Assumption
- Risk management and not prevention
- Bad habits
- Wrong materials used
We have, to an extent, already applied some lessons learnt to the construction of tall buildings.
So what are the areas of focus?
We need to:
- Eliminate risk through design
- Check the legislation
- Don’t use the wrong materials
- Design the whole, not the hole
- Ask, which interfaces need to be considered?
- Account for fire protection, both horizontal and vertical
- Ask, what are the riser options?
- Traditional or modular?
- What riser openings are required?
Design considerations
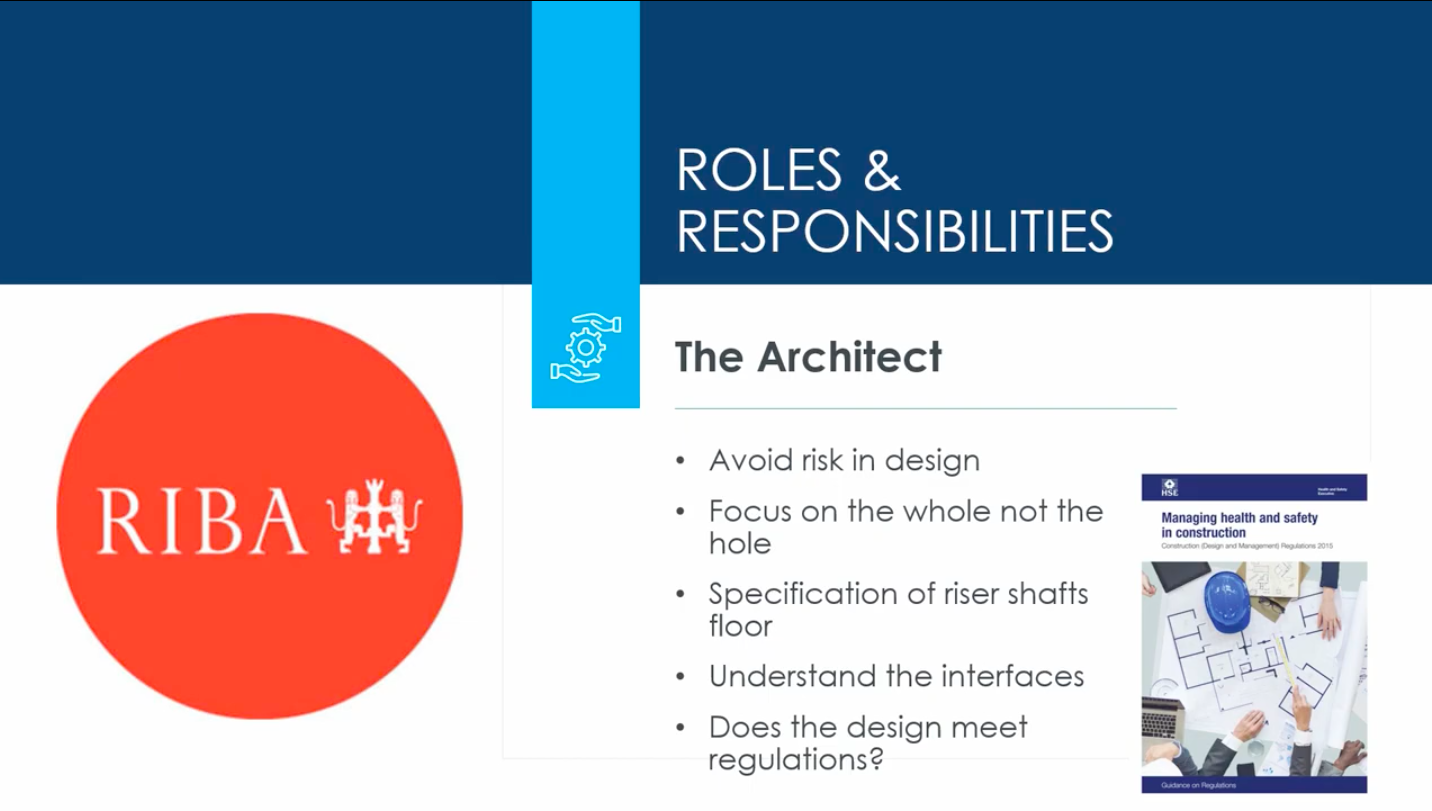
In our design considerations for the riser shaft, we need to remember our roles and responsibilities.
According to ‘General principles of prevention’ outlined in ‘CDM 2015’ Managing health and safety in construction, architects are instructed to avoid risk where possible when designing a building. Typically, architects will design the walls and doors around the hole, which in effect creates a shaft. But they fail their legislative requirement to design the hole itself.
With this in mind, architects must:
- Avoid risk in design
- Focus on the whole not the hole
- Specification of riser shaft’s final maintenance floor
- Understand the interfaces
- Look at whether the design meets regulations
The structural engineer’s roles and responsibilities include:
- Avoid risk in design
- Can the correct riser floor choice reduce/replace steel or concrete frame?
- Consult the regulations, the joint codes of practice, HSG 168, CDM 2015 and Approved Document B
The M&E consultant’s roles and responsibilities aren’t limited to designing for performance. It is about:
- Avoiding risk in design
- Can the right riser floor choice reduce/replace the steel frame for fixing of services?
- Look at what can be done e.g. single floor height modules
The main contractor has to:
- Eliminate risk through design
- Look at the whole, not just the hole
- Notify the principal designer of risks
- Consider whether money can be saved using the right riser floor solution
The client has to:
- Understand the importance of the riser shaft and the risk posed to clients
- Brand damage is greater than the cost of risers
- Their responsibilities under the CDM 2015
One of the most forward-thinking developers in the UK is Land Securities. Land Securities, also known as LandSec, has produced its own best practice guide, called One Best Way Design Safety Instruction Number Four. Within this guidance, the company has mandated riser protection within building design and has formulated a concise riser strategy which stipulates that health and safety are of paramount importance.
In order to eliminate risk through design, the CDM 2015 regulations, Construction Managing health and safety in construction should be consulted, as this document states to avoid risk where possible.
Digitisation is going some way to reducing risk throughout a building’s lifecycle. It is crucial, therefore, to take advantage of the latest technological advancements into BIM. The BIM design builds everything in the virtual world, so when it comes to the real world the risks have been taken away. All of the clashes have been removed, making for a far more efficient construction process.
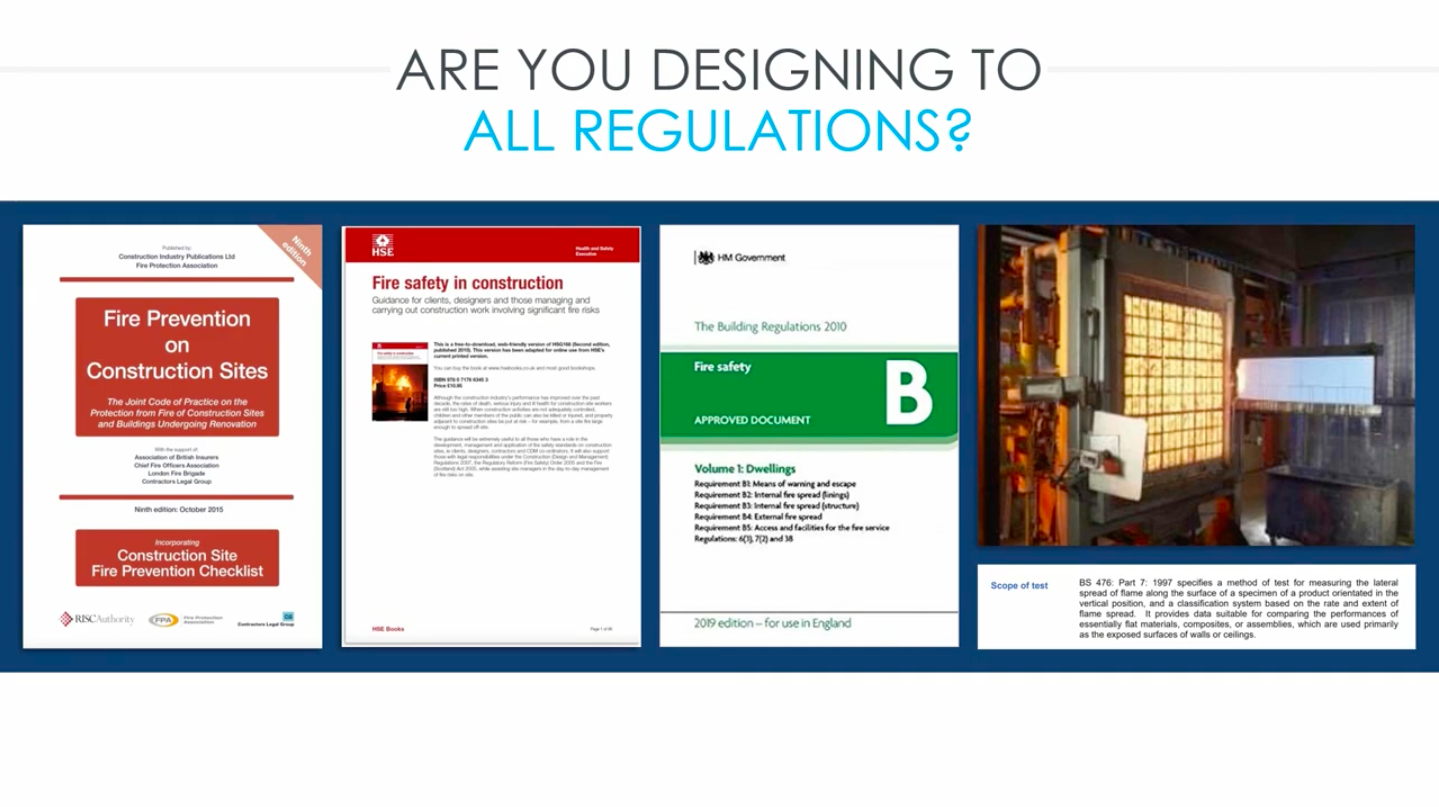
Regulations and testing.
Have you identified the necessary interfaces for your strategy? Looking at riser risks and the regulations, there are 13 clauses which touch the riser zone from four different guidelines, regulations and legislation. 12 of these clauses regard fire, and one is on falls from height.
Are you designing to all the regulations?
The following regulations include: ‘Fire Prevention on Construction Sites’ joint codes of practice, the HSE ‘Fire Safety in Construction, Approved Document B and CDM 2015.
When designing a building, have you reviewed the joint codes of practice, as this will affect your insurance? Have you consulted the HSE regulations for health and safety? Does your design meet Approved Document B? And are you fulfilling your obligations outlined in CDM 2015?
Although these regulations are important, there can be loopholes. They can be confusing and often contradictory, particularly in the case of the testing methods indicated in Approved document B. For instance BS 476 part 7 is often referenced for riser flooring and ceiling materials, this being a measure of the surface spread of flame. The test requires that the product is a flat sheet without holes. This test therefore cannot be applied to grating, yet designers and suppliers often incorrectly rely on it when using GRP grating.
The importance of material selection cannot be stressed enough.
Presently the tests required by regulations is the surface spread of fire under the British Standard BS: 476 part seven. But this involves testing a product in isolation in a laboratory, and not in the environment in which it is going to be employed.
Materials burn differently. Scaffolding doesn't stop fire, and the wrong type of glass reinforced plastic rating actually acts as a fuel source for fire.
However, modular steel riser floors are an alternative which do not burn, nor do they add to the fuel loading of a building.
Stopping the spread of smoke and flame is essential for the safety and wellbeing of everybody working on a construction site and through to building occupation and operation.
Yet at present falls from height and not fire is the focus purely because it is the visible risk. Without sufficient foresight, hidden issues go unnoticed.
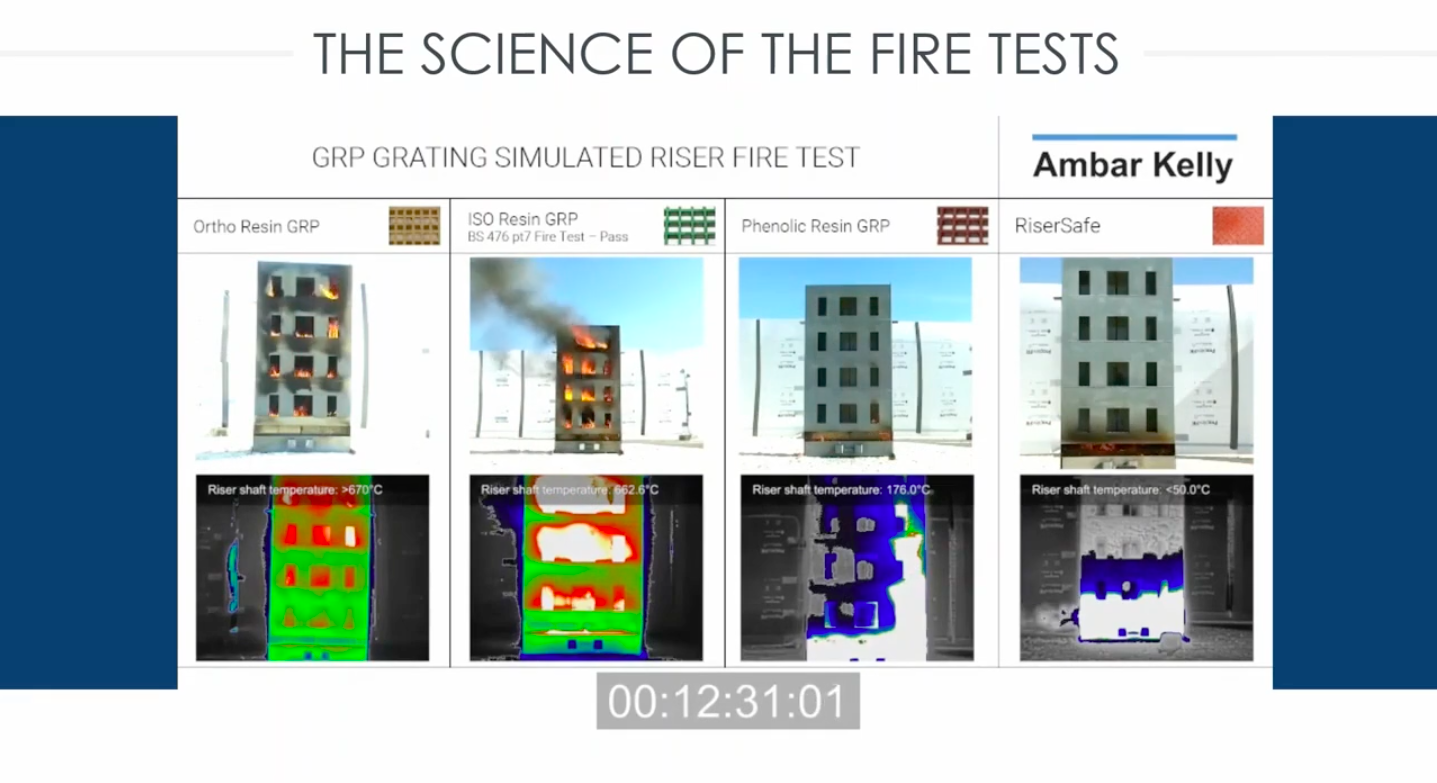
Currently, there is no relevant fire test within the British Standards for riser shafts. But we have adopted a clever principle which has been informed by the public inquiry into the London Underground fire at King’s Cross.
We produced a selection of mock-up riser shafts on a smaller scale to establish the burning characteristics of various products regularly employed in riser shafts, as a method for protection.
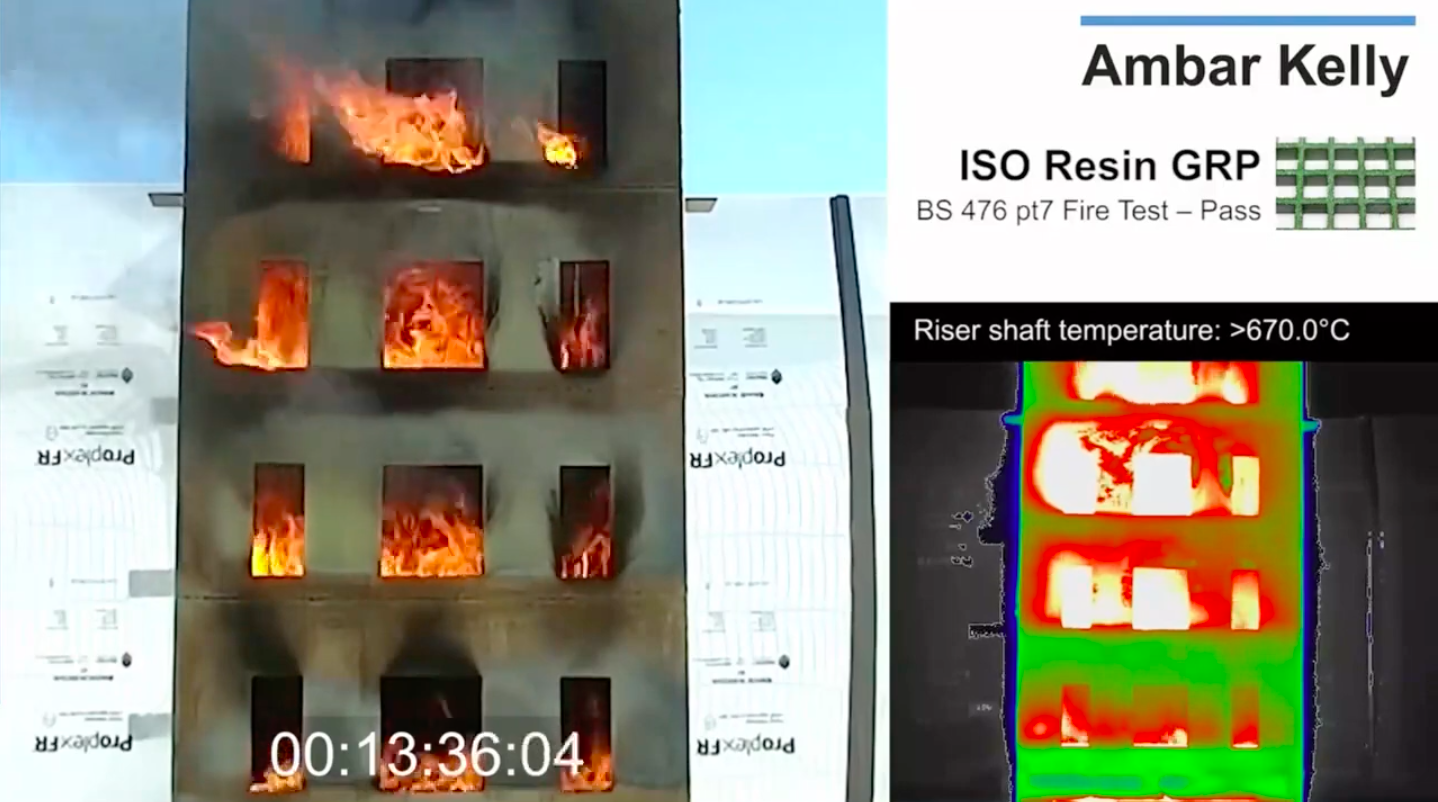
In this video you'll see the real time video, thermal video and the temperatures. They are all synchronised to establish the visible burning characteristics of the most popular products used in the construction industry today. The four products in this video are Ortho Resin GRP, ISO Resin GRP, Phenolic Resin GRP grating and modular steel riser flooring, RiserSafe.
From the videos, you can see the Ortho Resin GRP burns and can do so at temperatures above 670oC. The ISO Resin GRP grating is said to meet BS 476 Part Seven standards, but also burns at temperatures above 670oC. The Phenolic Resin GRP is the only approved GRP product used in the London Underground.
When we're thinking about the design of the riser shaft, we must be considering the regulations. We must be aware of the requirement to stop the spread of smoke and flame between floors to protect the construction workforce during the construction of a building. And when testing, we should be looking at the products employed in a riser shaft, as they have different burning characteristics.
The last of these examples shows the steel modular riser flooring, RiserSafe. The temperature in the riser shaft never gets hotter than 54.2oC. The flames never reach above the first level on the diagrams. It lasts over 90 minutes with 1000oC underneath it, without any loss of integrity.
This is the ISO Resin GRP grating which is said to meet BS 476 part 7. In this video it burns and reaches a temperature of 662oC. From this example it is quite evident what happens when the ISO Resin GRP, which is made from an oil derivative, burns at hot and dangerous temperatures.
In fact, GRP grating cannot accurately be tested to BS 476 part 7 as grating does not meet the test criteria.
Testing of steel modular riser floors.
The “Fire prevention on construction sites” document summarises that risers, shafts, ducts and similar openings between floors should be closed off with temporary fire doors on every level at every opening.
However, if steel modular riser flooring is used on a project, temporary fire doors are not needed, as this solution is a physical barrier to the spread of smoke and flame. Steel modular riser flooring also doesn’t burn or contribute to the fire loading of a building.
Although the regulations call for horizontal compartmentation within the riser shaft, the legislation, known as Approved Document B does not. But it's very easy to create a horizontal fire barrier using pre-designed products such as a steel modular riser. If you take the examples in the two left pictures, the steel modular riser flooring would act as a barrier to the spread of smoke and flame for 1.5 hours up to a temperature of a 1000° and will not add to the load of a building.
A fire compound can work in conjunction with the steel riser module to provide further protection.
This meets regulations, as it is non-combustible and non-flammable. When tested, it lasts for over an hour-and-a-half with 1000oC underneath it, proving integrity. GRP grating however, after seven minutes reaches a temperature of 214oC. At 12 minutes it reaches 662oC.
This diagram shows horizontal compartmentation in action. With a grating, shown on the left-hand side of the diagram, it is necessary to employ – as the codes of practice dictate – 30-minute fire doors on every opening at every level. Yet in this diagram it is clear that a grating is not stopping the spread of smoke and flame. If the temporary fire doors are left open, fire will spread.
However, if you use a modular steel riser flooring at every level, horizontal compartmentation is achieved. The spread of smoke and flame is wholly prevented as the modular riser flooring is made of steel which will act as a barrier to the spread of smoke and flame.
These tests, which were carried out by an independent testing house known as the British Research Establishment (BRE), showed no loss of integrity or insulation over two hours when combined with a fire compound and the modular steel riser flooring.
This is a finished example from 52 Lime Street, London of a horizontal fire protection barrier between a plant room and a shaft. These barriers are highly efficient, if the right strategy is employed. In this example you can see the modular riser floor plate has been recessed to act as formwork for a fire compound to be installed, offering in excess of two-hour fire protection without loss of integrity or insulation.
Let’s look at the pros and cons of scaffholding.
If we look at the pros and cons of scaffolding, the positives are:
- Widely available
- Can be adapted as required
- Installed by trained contractors
The cons include:
- Constant adaptions due to design changes or delays in services being fitted
- This has a heavy cost over the construction of a project for unplanned work
- Time penalties for adaptions to be made
- Scaffolding will only prevent falls from height and will not provide fire protection
GRP Plastic rating.
The pros include:
- It is easy to fit and adapt
- Cheap to buy
- Single function product
The cons:
- It burns fiercely
- Easy to affect its integrity
- Needs structural steel to support the grating when cut for services
- There's working at height adaptions
- It's flexible but it needs strengthening
- Flammable and combustible
- Costs can escalate during building due to adaptions
- Heavy captured carbon content, the highest in the industry
Modular steel riser floor.
The pros:
- Lowest out-turn cost for the project
- It's predesigned
- Has 11 functions across a project
- It's a fixed price
- There's no maintenance required
- Does not burn
- Built off site
- Prevents falls from height through the build process
- No ongoing adaptions required
- Last the lifetime of the building
- Easy to recycle
The cons:
- Higher entry price
- Relies on early design
- Needs buy in from all parties
This is an illustration of a holistic riser strategy.
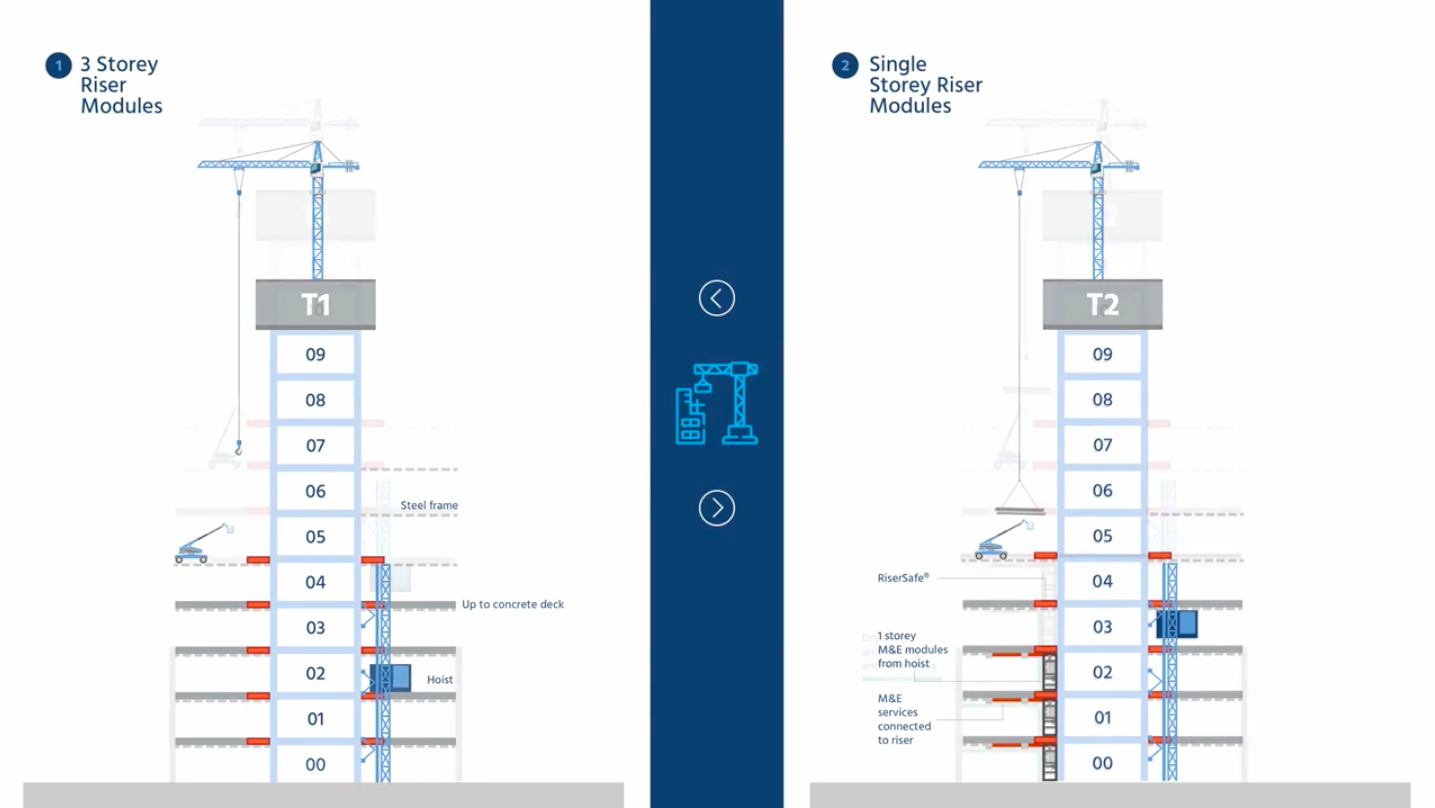
At present, the M&E contractors sometimes look at installing riser modules in three floor lengths, which is about 12m. The illustration on the left-hand side shows a building which will be using three-storey riser modules. The diagram on the right shows single-storey riser modules.
We are encouraging the use of single-storey riser modules, as they are quicker and easier to install and allow other packages of work to be completed at the same time, so not to disrupt construction work. Single-storey risers are inserted at every level with a hoist and are not crane-lifted into position three at a time, as would be the case with three-storey modules.
On the left-hand side of this slide, the three-storey riser modules have not been installed. But on the right-hand side, single-storey modules have been installed. In this example, the risers are being installed one at a time along with the other packages of work, such as M&E services and dry-lining. It is a seamless process where everything is done in unison.
Now, the three-storey modules are only just being installed. Conversely, on the right-hand side, four floors have been finished completely. The single-storey riser modules, the M&E services and the dry-lining are all now in place.
Adopting a single-storey riser module strategy reduces total construction time by seven-to-eight weeks, making for an uninterrupted construction process without added costs and time delays.
Furthermore, to meet the codes of practice and HSG 168, openings need to be closed off on every level. The riser shaft on the left has to be open all the way to the top for the three-storey modules to be installed. Whereas on the right, the single-storey modules seal every opening at every level, meaning fire cannot spread should it occur.
Here are some examples of a single floor height module. The electrical module is on its side and is lifted into a vertical position. The pallet truck wheels the unit over the top of the riser flooring and straight into position. It took less than four minutes to install this. There’s no waiting around for the building to get to the right height before the modules can be lowered in.
This is an example of a M&E modular installation system. For 52 Lime Street, we executed a mock-up scenario in which a single-storey module was installed using a hoist and electric winches. This was installed quicker than a three-storey system that is crane-lifted into the shaft.
In the video, the M&E single-height unit is being lifted into position in two minutes and fifty seconds. In this mock-up it took less than two hours to install the system. This system was used on all 37 floors of 52 Lime Street.
Three-storey riser modules are considered a very efficient way to install mechanical, electrical and plumbing services.
This graph, known as the line of balance which is used by many manufacturers across the world, indicates that if you are completing a task on a weekly basis you want all your materials and resources available at that time.
But because of the nature of these huge three-storey prefabricated riser modules, and the resources required to install them, the focus is on waiting until the building‘s structure is at a height where they can get the most efficient method of installing these prefabricated rows and modules.
Whilst you're waiting for those to be installed, and the building to reach a sufficient height for those to be installed, there is no other activity or follow-in trade which can carry on. You will note through these illustrations they are actually adding seven to eight weeks to the total construction programme of a project.
However, on this line of balance for the single-storey solution, all packages of work are going in on schedule at a week at a time.
Cost comparisons of solutions.
What are the real benefits against cost?
We have taken the standard two-and-a-half by one-and-a-half metre riser opening running up 11 floors and have modelled the costs of three more established riser zone protection products. You will see that we've split them into their three separate and distinct methods.
The modular riser flooring has been casted in. Traditional scaffolding; they're forming the house with temporary shuttering and trims. The same with the GRP method. You will see that as they go through the construction cycle that they're still constructing scaffolding GRP.
The services are actually being fitted significantly earlier than the other two options. In the programme, we established a 30% time saving in the construction of the completed riser shaft.
Now, within this video we've identified the cost of the three established methods. You will note the cost for the modular riser floor. In this example RiserSafe demonstrates the cost increases significantly at speed.
But then a strange thing happens. The costs stop. When initially looking at the cost, most people are only looking at it from one perspective. You can see the cost increases over and above in this purchase perception graph.
When making a judgement based on price and not function, it will be obvious that people would select the cheaper product. But if you actually break down the costs over the life of the riser shaft on a project, you can see the cost of a modular riser flooring sits considerably higher. It is almost 50% higher than the GRP grating in the frame package.
But we must understand that it's not just the frame package. It is the roofing, the dry lining, the general build, the builders’ works, mechanical and electrical and the scaffolding costs over and above the cost of the fall protection, which make costs grow.
If you get it designed right first time you have:
- Eliminated risks from falling from height
- Stopped the spread of smoke and flame
- Designed where the services will penetrate for fast quick and easy installation in perfect safety
- Removed hidden costs or non-tangible costs which occur on every project that is unplanned
Here is another purchase perception graph.
The horizontal blue line indicates the RiserSafe modular riser flooring cost whereas the yellow line represents Phenolic GRP grating.
Commercial teams will analyse these comparisons and look to buy the solution in the Phenolic GRP package which they believe will save on cost and provide full protection.
The initial cost of Phenolic GRP compared to RiserSafe is lower. However, there are accumulative costs as the project progresses. Roofing, M&E, drylining and scaffolding are costs which are not associated with the frame, but they do add up. It means the project arrives at an out-turn cost far higher than expected.
The cost of RiserSafe, however, doesn’t change, as it is a bespoke system which can incorporate all of these packages of work.
To minimise project costs, it is crucial to start with the end in mind. Looking holistically at the riser shaft and considering its design from the outset will allow project teams to reap the cost savings.
There are 11 functions of the modular riser floor.
It saves money on shuttering and trims and removes the need for handrails; because if you haven't got a hole you haven't got a risk. To put it simply, you don't need the handrails.
It also stops the spread of smoke and flame between every floor, as it is a physical barrier to fire and smoke. This solution has a load bearing capability of up to 2.5 kN/m2.
Depending on the design, the floor can provide a storage area for materials. It can be the formwork for horizontal fire protection and can be fixed points for separating walls and firewalls.
It is part of the fixing points for mechanical and electrical services. It could be the casting of weathering properties for the top of service riser stops, and it drives design to an early completion regulation and testing.
This video signifies that if a holistic riser strategy is adopted, the hole is formed and protected and lasts throughout a building’s lifecycle. It allows all the trades to work safely without risk and delays, making it completely safe for the construction teams and the building’s occupants and users.
Here are a few projects Ambar Kelly has worked on.
We supplied RiserSafe to One Crown Place, a mixed-use development in London. On this project we worked alongside main contractor Mace and subcontractor Joe Bermingham. The concrete and steel frames were built by Getjar and Severfield NI.
Damac Tower. Another excellent example of modern architecture. This stands over 52 floors and utilised RiserSafe on every opening on every level. It is one of the most technically challenging projects in London to date.
For the One Triton Square project, additional floors were installed on the top of the original structure with a completely new design. Its new design connects the old with the new and was carried out to great success.
Conclusion
As we end the CPD, the industry would do well to:
- Eliminate risk through design
- Change habits
- Understand the true cost
- Understand material selection
- Falls, fire, cost and time: Eliminate risk through design.
Remember to eliminate risk through design. Thank you for your participation.